Wednesday, February 20, 2013

Okie Dokie Artichokey!


Artichokes are a real powerhouse veggie. They are low in calories and fat, but a rich source of dietary fiber. These green guys also contain an excellent source of folic acid, vitamin-C, vitamin-K, B vitamins, various antioxidants and minerals such as calcium, potassium and iron. 

After countless visits to Bandera (click here for other Hillstone restaurant locations) spent enjoying their incredible grilled artichoke appetizer, we decided to try and recreate the dish ourselves. We grilled the artichokes on the bbq to give them that authentic flame broiled taste. We were so plesantly surprised at the success of our creation! The result is a dynamic mix of tangy and smoky flavors that really compliment each other. As the weather begins to warm up, we highly encourage everyone to hit the BBQ and try this recipe at home. It makes for a great appetizer for guests or a super scrumptious snack.

For the artichokes

4 large artichokes, rinsed and top 1/3 removed
2 lemons, cut in halves
1 cup of olive oil
4 garlic cloves, minced
Coarse salt
Ground pepper

1. Bring one large pot of water to a boil and place artichokes inside.  

2. Cover and cook for 20-30 minutes, or until and outer leaf can be pulled off easily.

3. Drain the artichokes and let sit until cool enough to handle.

4. Cut the artichokes in half from top to bottom and discard the purple leaves and hairy choke. 

5. Place in a bowl and toss together with the olive oil and garlic.

6. Let marinate for 20 minutes while the grill is preheating to a medium-high heat.

7. Sprinkle salt and pepper evenly over the artichokes. Place them on the grill for about 5 minutes on each side or until the outer leaves become lightly charred around the edges.

8. At the same time place the lemon halves on the grill for about 1 minute.

9. Remove from grill and place artichokes on a platter for serving. Drizzle them with the juice from the lightly cooked lemons.

For the lemon-garlic aioli dipping sauce

1/2 cup mayonnaise
1 teaspoon finely grated lemon zest
2 tablespoon fresh lemon juice
1 teaspoon Dijon mustard
1 clove of garlic, minced
Coarse salt
Ground pepper
Balsamic reduction for garnish


1. Combine the mayonnaise, finely grated lemon zest, 1 to 2 tablespoons fresh lemon juice, Dijon mustard, and minced garlic. Season with coarse salt and ground pepper. 

2. Garnish with balsamic reduction.

Happy tasting,
Paul/a


Friday, February 8, 2013

Breakfast Is For Champions

We have all heard it over and over again: the most important meal of the day is a balanced breakfast. We aren't arguing. In fact, we completely agree. It is crucial to feed your body with energy-packed nutrition that will help jump start your day, but sometimes that is easier said than done. Time is a big factor in the morning and we would bet that most people feel that they don't have enough of it before heading off to school or work. It's tough, but give yourself an extra 15-20 minutes in the morning to make something delicious and healthy to start your day. Your body and mind will thank you. 

We routinely rely on oatmeal for our first meal of the day. It's easy, tasty and the variation possibilities are endless. We use Trader Joe's Quick Cook Steel Cut Oats for their speedy cook-time (8 minutes) and their nutty, distinctively chewy texture. Not to mention, these bad boys pack 40 grams of whole grain, 4 grams of fiber, and 5 grams of protein per serving. This morning, we simply added a chopped apple and sprinkled a tablespoon of brown sugar to get Friday started. 


Happy Tasting,
Paul/a

Sunday, February 3, 2013

Geaux Niners!

And this is what I get for procrastinating...still really proud of my 49ers!!! Disappointing finish, but an amazing 2nd half. I have faith that we will bring it home next year. :)
It's Super Bowl time...Geaux Niners!!!
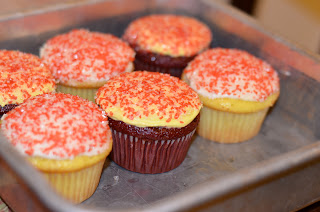
That is all. Oh, and here are some delicious 49er-inspired cupcakes I (Paula) created for my brother's Super Bowl party.

1. Red velevet cake with sugar frosting and sprinkles.
2. Lemon cake with cream cheese frosting and sprinkles.
Happy tasting,
Paul/a

Saturday, February 2, 2013

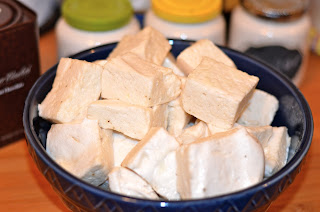
Melt In Your Mouth Marshmallows


This recipe is a little intensive, but once mastered, you will have the most amazing marshmallows you've ever tasted. Marshmallows were once considered a delicacy, but now we think of them as those rubbery things we buy in bulk. Please feel free to put these in a nice hot cup of cocoa*, on top of some ice cream, in a s'more, or enjoy one of these pillowy bites of heaven all by itself. WARNING: once you have these marshmallows, you will never want to buy the bag of Jiffy-Puffs again.

*Our very favorite hot chocolate is from a small chocolatier shop called Ginger Elizabeth. Please check out the online shop, and treat yo'self!

Yield: 25 marshmallows

INGREDIENTS:

2 envelopes (about 15 g) powdered gelatin
1/2 cup + 1/3 cup cold water
1 (200g) cup sugar
1/3 cup (100g) light corn syrup
4 large egg whites at room temperature
1/2 tsp kosher salt
2 1/2 tsps vanilla extract
3/4 cup corn starch
3/4 cup powdered sugar

*You will need a candy thermometer for this recipe*

1. Sprinkle the gelatin over the 1/2 cup of water, in a small bowl, to dissolve and soften.

2. Mix the sugar and corn syrup with 1/3 cup of water in a small saucepan, and cook over medium-high heat. Attach a candy thermometer to keep the temperature.

3.  Pour the egg whites in to the bowl of a stand up mixer and beat on medium-low. Once a little frothy, add the salt and continue to beat the egg whites on this speed.

4. When the syrup reaches about 210˚ Fahrenheit, increase the speed of the mixer to high, and beat the eggs until they are thick and fluffy.

5. When the syrup reaches 245˚ Fahrenheit, slowly pour the hot syrup into the whites. You can lower the speed on the mixer if you would like, and make sure not to hit the whisk with the syrup when pouring it into the egg whites.

6. Scrape the gelatin and water mixture into the pan that you used for the syrup. The residual heat should be enough to melt the mixture completely.

7. Slowly pour the liquified gelatin and add the vanilla into the egg whites while it is whipping.

8. Mix the corn starch and the powdered sugar in a bowl.

9. Dust a baking sheet evenly and completely with the starch/powdered sugar mixture (you can use a sifter or a fine mesh strainer to do this).

10. Once outside of the standing mixer bowl is completely cool to the touch (this may take 7-10 minutes of whisking until cooled), use a spatula (I put non-stick spray on it) to spread the marshmallow mixture on a pan, in an even layer.

11. Allow the marshmallows to dry, completely uncovered, for at least 4 hours (preferably overnight). If the marshmallows are damp on the bottom, after this drying time, this most likely means the mixture was not completely cooled before being spread out on the baking sheet. In this case, you can blot the moisture off with a paper towel and dry them with the damp end up overnight to dry them out further.

12. Once dried, dust the top of the marshmallows with the starch/powdered sugar mixture and cut the marshmallows into any shape or size you would like (kitchen scissors or a pizza cutter works well for this).

13. When the marshmallows are cut to your liking, toss them in the bowl that has the remaining starch/powdered sugar mixture, in order to coat all sides. Then toss them in a strainer and knock off any excess powder mixture.

14. You may store the marshmallows in an airtight container for up to one week, at room temperature.

15. Enjoy!

Happy Tasting,
Paul/a